Shop Notes Blog
As we all know, a flute is a hollow tube with holes in it. Early flutes were usually made of bamboo, cane or even bone. Flute makers tended to use these types of materials because they were either already hollow or were very easy to hollow out. Early flute makers did not grab a nice, seasoned branch from some tree in the rosewood family and start trying to gouge it out with a pen knife! That would be brutal. They took the easy road and adapted natural materials to their purpose.
Modern makers have expanded their horizons in terms of materials because the advent of modern tools has made it possible. Hardwoods, plastics and metals are all in use thanks to technology. As a maker of wooden flutes, I have a lot of creative options, but at the end of the day I still need a hollow tube. And that brings me to the drill.
And not just any drill. A really, really big drill.
I had heard of makers using what are called “gun drills”, which are long, hollow drills that were originally created for making firearms. They evolved to have a multitude of applications for what is called “deep hole drilling” and they are ideal for flute makers. The easiest way to use a gun drill is to mount the wood in a lathe which will spin it at high speed while the gun drill is fed into the work. So whereas a normal drill of the everyday variety turns a drill bit to cut into stationary wood, the usual gun-drilling set up spins the wood and the drill stays stationary (or at least it doesn’t spin). At the same time that the drill is being fed into the wood, compressed air is being forced through the hollow shaft of the drill and out of some small holes at the cutting end, ejecting the chips from the bore as you drill. This is crucial! Without this air, the bore will quickly clog with chips, overheat and probably make your wood burst into flames!
I did a lot of research about gun drilling, and most of the solutions were very expensive. I was hovering on the edge of the subject, not willing to commit to expensive equipment without really knowing what I was doing when I was fortunate enough to talk with fellow flute maker Russ Wolf. It turns out that Russ–a very creative thinker–had already solved a great many of the problems that were intimidating me, and he was extremely generous with his knowledge and assistance when I told him I wanted to drill my flutes. He showed me his set up, which was actually quite simple and relatively inexpensive.
I almost copied Russ’s set up. I thought long and hard about it, but decided to see if it could be improved upon. So I brought in a consultant. This consultant is a local machinist of vast experience who is known to friends and family as “Mr. Wizard” because of his problem-solving acumen. You don’t meet many of his type any more. He has been a working machinist since the early 60’s, trained in the Navy and then apprenticed at some of the big engineering giants like Hughes. He combines an education in math and physics with 50 years of practical machining experience and I could not have found a better collaborator. He lives in a little town up here in Humboldt, but places like the Navy Rocket Lab send to him to build prototype parts for their various projects. A rare breed. I took some photos and drawings to him and said “Here is what I know and here is what I’d like to achieve” and I let him think it over.
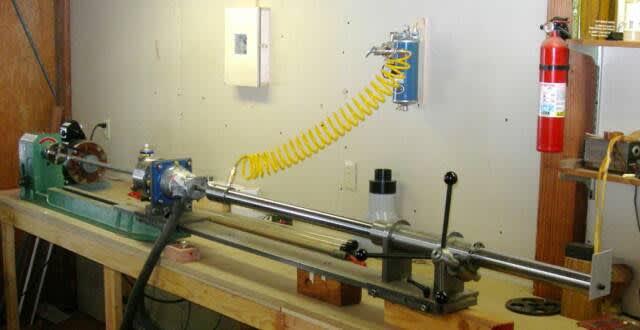
His solution was better than anything I had hoped for. He ended up building a drilling rig for me that has capabilities far beyond most flute making drill set-ups. It’s big, mind you. When I’m drilling a large flute the whole rig takes up about 13 feet of space or more. It is adjustable and allows me to drill a hole anywhere from 3” long up to 48” and with a diameter ranging from the size of a pencil up to 1 1/4”. What this means is that I can make virtually any kind of flute that can be physically played by a human being. I didn’t necessarily envision this type of range when I took the idea to him, but his philosophy is one of maximizing function and flexibility. If you can make a drill that will do all of this and not cost too much more, why not do it?
We adapted an inexpensive Harbor Freight wood lathe. This is mounted on a bench (bolted securely) and the motor replaced with a big, 3 HP three-phase motor that runs on a variable frequency drive. This allows me to control the RPMs of the drill. The lathe tail stock was removed and replaced with a custom built tail stock with a huge 4 jaw chuck attached. A bed extension of 1/2” steel stretches an additional six feet beyond the lathe bed, and the tail stock rides on this. At the other end of the bed extension is a huge, horizontal drill press. You have to see it to believe it :-) Naturally I’ve included photos, since words don’t do it justice. The entire drilling apparatus was manufactured from scratch. He fabricated every single piece of it from raw steel and it works like a charm. It has a special tool holder that allows me to fit various size drills into it, and it is ingeniously plumbed to allow compressed air to be fed into the drills through the tool holder itself.
It’s built like a tank, as well. I’ll be passing it along to the next generation most likely. The only thing about it is that it can be very, very loud. The shaft of the drills pass through custom made guide bushings in the tail stock and once the cutting head of the drill is through, the shaft is held rather loosely inside the bushing. The drills are self-centering, so once they start drilling you don’t need to worry about having a guide bushing anymore, but the shaft of the drill is now vibrating inside of a metal tube that is spinning at 1200 RMPs. When the resonance is just right, the metal begins to scream like a banshee, creating a volume of noise that is truly stunning. Louder than any power tool in my shop, and on a quite day you could probably hear it half a mile away or more. It’s rarely that bad, but when it is I’m grateful that I live out in the middle of nowhere!
The drilling method has made almost anything in the world of flute making possible for me.
Published Friday, October 26, 2018