Shop Notes Blog
Bamboo Journey: Part 1
Flute players love bamboo.
This is something I’m qualified to say, because over the last twenty-five years of my professional career as a flute maker, I’ve talked with a lot of players on the subject of materials in relation to woodwinds of various kinds, and I have not yet found anyone who did not like bamboo flutes. There are players who have never tried it, and players who have limited their use because of issues related to cracking, but I haven’t heard anyone so far say that they dislike it as a flute material. Just the opposite, actually. Most of them tend to rhapsodize about its special qualities and unique sound.
And this love is not limited to flutes, since it is probably the single most versatile and useful plant on Earth, and most human beings seem to feel a deep, inner connection with it. And despite the tendency of some types of bamboo to crack, it’s completely accepted as part of the bamboo experience. After all, cracks can usually be repaired.
I love bamboo as well. Two of my personal favorite flutes in my collection are bamboo (and neither was made by me). One is a Patrick Olwell bamboo D transverse flute and other is a xiao from China (I don’t recall the name of the maker, but I can attest that he is very skilled). These flutes have a sound…a vibe, if you will. In short, they feel good. They sound really good, and they even smell good! There is just something about bamboo.
So, even though I love bamboo and everyone else does too, until recently I have never made bamboo flutes. Why is that?
I don’t have a good answer for this. Certainly the challenge of sourcing suitable bamboo was always a perceived barrier (I don’t live in the tropics, where I incorrectly imagined most bamboo came from). Then there was my fear of making instruments that would later crack—I really didn’t like that idea! Then there was also the highly organic nature of working with bamboo. Every single piece is different, so you need a flexible approach in order to use it effectively, and I’ve always been a bit obsessed with consistency. So taken all together these concerns intimidated me a little bit.
Well it turns out that all of these challenges weren’t really that challenging once I decided that I wanted to try working with bamboo. I have a lot of acquaintances from the flute world, many of whom have background in playing or making bamboo flutes, and I simply sent some e-mails and made some phone calls to start the learning process. I was fortunate in picking my bamboo contacts (a big thanks here to Patrick Olwell, Greg White Hunt, and George Tortorelli), all of whom were kind and generous in sharing their knowledge of bamboo. And as always I got great information and insight from my long-time collaborator Jon Walpole, who has had an ongoing interest in bamboo flute-making, and who has made some superb bamboo flutes of his own (Jon is often the first person to try any new flute I create). The rest was an internet search away, since there are tons of people into bamboo and therefore no shortage of information on all things bamboo.
In keeping with my usual methods, once I decided I wanted to get into bamboo I instantly threw myself into the deep end of the pool! I sourced a bunch of excellent bamboo and started learning the new medium, and I must confess, that I don’t think I’ve ever had this much fun in the course of my career!
My first bamboo harvest took place in December of 2020 at Bamboo Sourcery in Sebastapol, California. The owner and staff were kind and helpful, and when they found out I was going to make flutes they were genuinely pleased. Their generosity and enthusiasm was really inspiring and I spent a delightful day wandering their groves cutting bamboo. (I devote an entire blog to my second visit which I made just a couple of weeks ago. Check it out HERE.)
The entire process is completely engaging, from picking over the bamboo stock, selecting which pieces are appropriate for each size and type of flute, heat-curing them, drying them, and ultimately using all of my experience and intuition to figure out how to make them into a fully realized instrument. Here is a colorful selection from my first bamboo harvest:
One of the unexpected and delightful parts of working with bamboo came in the form of one of those very Zen-type lessons: I get the best results from not forcing the bamboo to be what I want it to be, but rather by letting the bamboo tell me what it wants to be, and not holding too tightly to expectations. In practice it is not quite so whimsical as it sounds, because it is necessary to sort different types and sizes of bamboo based upon what they are suitable for, so at one level I do determine (in a more general sense) the destiny of each piece. The length and diameter of the bamboo is the big determining factor.
When I make a flute from wood, I decide everything about it (bore length, size, shape, etc..) and I know what type of flute I’m about to make from it. With bamboo, I have to take a look at each piece, check the dimensions and shape that nature has already made, and then decide what type of flute it is best suited to. And beyond that, the unique characteristics of each piece determines other qualities, such as the voice and timbre, what scale will work best, etc.. Some pieces of bamboo have natural tapers in the bore that make them a great candidate for certain styles of flutes, whereas others are more cylindrical and therefore suitable for something entirely different. Some have thick walls, some are thin. Straight, crooked, shorter, longer.
But despite this flexibility in using the material, I still have a bin full of rejects. When I decided to embrace this medium I expected the research and development to be similar to any other project I take on. Therefore I knew that some percentage of my early attempts were going to end up in the garbage. But one of the advantages of having made a lot of flutes over the years is that I was able to shorten this learning curve and get the hang of it without wasting quite as much bamboo. But there is still a culling and selection process that happens in multiple stages along the way, with only the best and most suitable pieces making the final cut, and in many ways I’m still a student of bamboo flute making.
Embracing this new medium also had the effect of refreshing creativity around my flute making. I’m always trying new things and I’m far from being complacent about my craft, but the organic quality of the bamboo and its very “newness” really opened up some creative outlets for me. Suddenly I was considering different approaches that would allow for the uniqueness of bamboo to manifest itself while at the same time allowing me to craft consistent, high-quality instruments. In short, it is completely unexplored territory and is just plain fun.
And Bamboo Fever has set in to such a degree that I’m actually planting my own bamboo grove, hoping to have a few different varieties available to me directly, though it will take a few years before they are mature enough to utilize. In the meantime I’m fortunate to have some excellent sources for the fresh canes as well as the ability to harvest my own just a few hours away from where I live.
Part 2 - Preparing the bamboo
Until my own groves of bamboo mature, I’m either harvesting myself or having freshly cut tropical bamboo delivered to me from Florida. And the first thing that has to be done is the removal of the nodes, followed by heat-curing and drying. I live in a cool, humid climate, and I discovered that green bamboo–especially the tropical varieties– can degrade if left uncured, especially in the Winter. This doesn’t always occur, but I try to forestall it by processing the bamboo while it is fresh.
Therefore I remove the nodes from inside the culms (where appropriate). For those unfamiliar with bamboo, the nodes are naturally occurring membranes that comprise the joints of the bamboo, separating the hollow sections of the stems. These can be useful at times, but for most of the flutes that I make the nodes need to be removed. On long piece of bamboo this can be surprisingly tricky, especially when it’s not straight. To make this more efficient, I have created a wide variety of reamers of different sizes by taking spade bits and grinding them into a sort of teardrop shape and then attaching them to special bit-extensions that go into an electric drill. This provides me with a series of long reamers with which to clear the nodes completely from the inside of the culm. This is followed by some polishing with coarse steel wool to clean the bore of any residual debris. This polishing step happens several times along the way to becoming a flute. Here is an example of a home-made reamer:
I like this approach with the black bamboo because it gives me the option to keep long bamboo flutes in one piece. When you buy a Chinese made xiao or dizi (for example) that is made from black bamboo, they are (virtually) always fitted with joints. There are good reasons for this, one of which is the convenience of being able to take the flute apart for transport and storage. It also allows the maker to select separate pieces of bamboo (not necessarily from the same culm) that are the optimal diameter, bore size, etc. for making that particular flute, and lets them cobble them together for a more uniform result. Plus it makes it very easy to clear the nodes from inside the culm. A single, long piece of bamboo is rarely perfectly straight, nor is the bore uniform throughout its length, so getting in there to remove the nodes is a real art form. But the aesthetic is wonderful, and well worth the trouble, despite the fact that the flute is less convenient to travel with.
After the bore is cleared, next is the heat cure. Heat curing bamboo is a standard practice for many bamboo artisans around the world. Just do an internet search for “heat curing bamboo” and you’ll get the picture. The heat curing can be done a number of ways—anything from a fire pit full of coals, to various types of gas torches. Heating the bamboo removes the waxy, outer skin of the bamboo, turning it a more golden-brown color (in the case of green bamboo), and it forces moisture out of cellular structure. I do my heat curing with a roofing torch hooked to a 5 gallon propane tank.
The roofing torch is a powerful propane torch (the type that roofers use for melting the bitumen on rolled-on roofing material) that allows for a great deal of control over the intensity of the flame. Using such a torch on bamboo takes a bit of practice to master. I use it to both treat the outer surface of green bamboo, and also to “cook” a lot of the moisture out. I’m still experimenting to learn how different varieties of bamboo respond to being heated like this. One of my favorite types of bamboo for my transverse flutes is a species called bambusa multiplex silverstripe. It has a natural taper in the bore that has many acoustic advantages, but it’s also an incredibly tough and stable type of bamboo, highly resistant to cracking. It is also very tolerant of being cooked! I can torch these pieces to the point where the steam just keeps pouring out the ends, eventually drying them down to about 13-15% moisture content, which is pretty dry for bamboo that only minutes before was completely green!
On my black bamboo, I was more more cautious because it is more likely to experience cracking issues, and after some experimentation I decided that vacuum drying it was best, omitting the heat altogether. Plus the skin of black bamboo is gorgeous in its natural state, and heating it changes its presentation. After a few experiments I realized that I didn’t want to alter the exterior of the black bamboo since it is one of the most visually interesting species I’ve seen.
But because I’m in a damp climate, I want to take every precaution and get the bamboo as dry as I can before I store it. So bamboo that I cannot heat cure goes into the vacuum chamber.
For those of you who have read my past blogs, you will know that I have a large vacuum chamber that I use for resin-infusion of wood. This is a cylindrical chamber about 40” long and 15” in diameter on the inside. It’s made of aluminum with a plexiglass door at one end, and various ports for connecting hoses for different purposes. Its primary function is to create a sustained vacuum inside, using a vacuum pump. These chambers are often called a “vacuum kiln” because they will dry wood or other substances by physically pulling the moisture out of it!
I can fit about 100 pieces of bamboo in my chamber, on average. The black bamboo needs about 48 hours under vacuum, and this will reduce the moisture content to the point where I don’t need to worry about mold.
Ideally, I would prefer to have the luxury of simply putting the bamboo on a rack to finish drying but I’ve been reluctant to risk it in this humid environment. (UPDATE: I’ve been researching methods of air-drying bamboo and I’m planning to experiment with this approach for black bamboo particularly, and I’m even toying with putting it in a saltwater bath first). However, the vacuum process has the additional advantage that it makes the material usable in a very short window of time. There is a further advantage to vacuum drying: some types of bamboo tend to crack when they are being air dried. I asked a bamboo expert his opinion on why this happens and he said it’s mostly due to the unevenness in the drying process. It’s very difficult to get bamboo to dry perfectly evenly, and if there is too much sun exposure or air movement, or a heat source on one side of the bamboo (for example) it might dry unevenly and that might cause it to crack. And matters are even more complicated owing to the fact that different parts of the bamboo shrink at different rates (which is why finished bamboo flutes crack when they change climates).
But by going straight to the vacuum chamber, I essentially bypass the air drying phase with its risk of uneven drying. The vacuum chamber pulls the moisture out, drawing it out of the capillaries. It does this steadily on every single piece of bamboo, and it does it in a relatively short amount of time. I theorize that because the vacuum surrounds the bamboo completely, exerting its force from every direction simultaneously, the bamboo seems to behave itself. I have not (so far) had any cracking of bamboo during the drying process, but I have had some dry pieces crack later on during storage.
After the drying is complete, I sort the bamboo based upon what type of flute it is most suited for.
Part 3 - Built to last (I hope!)
As mentioned in part 1 of this series, I shied away from bamboo for many years because I had some concerns about flutes that crack, so when I started making bamboo flutes I was immediately wondering what can be done to prevent this. And this made me ponder the question: why do bamboo flutes crack in the first place?
I didn’t have to ponder very long, because the answer is obvious, since it applies to wooden instruments as well. Temperature and humidity. Bamboo, just like wood, will change its dimensions in response to changes in moisture content, trying to equalize itself to the ambient environment. The inner structure of bamboo is such that movement (the swelling and shrinking that is caused by changes in temperature and moisture content) does not happen uniformly throughout the culm, so this creates tension which leads to cracking. It can happen quite suddenly if there is a radical change in climate, or if the bamboo is exposed to conditions that put it under stress (such as warm air being blown into it while you play outside in freezing weather). I have a friend in New York who kept his bamboo flutes in his basement, and when the air was dry in the Winter he said he could hear them popping! But it should be noted he had not taken any steps to protect them from the dryness.
The first, most obvious way to prevent cracking is to avoid exposing the flute to undue stress, meaning that the player has to know better than to go blow the flute outside in freezing temperatures, or leave it on the dashboard of their car on a sunny day, etc.. Common sense helps a lot. Shakuhachi players, some of whom have very expensive bamboo flutes that they spent thousands of dollars on, keep them in climate controlled containers that give stable humidity.
But as a maker, I wondered what I could do to make my flutes extra robust and more resistant to stress. One of the most simple things would be to attenuate this exchange of moisture within the bamboo. Now, as mentioned before, some bamboo varieties are already really stable, such as the mulitplex silverstripe. But black bamboo, that I favor for making xiao and some shakuhachi, is less so (and this seems to be dependent to some degree upon the diameter of the culms). I have not yet made enough flutes from it, nor had them out in the world long enough to determine just how sensitive they are, but I was determined to use an ounce of prevention before I ever sent them out of my workshop. I’m optimistic given their long tradition of use in the making of xiao in China. Properly utilized, they should be reliable.
The first and most common way to attenuate the changes in moisture within the bamboo itself is to create a barrier between it and the surrounding environment. Basically, it needs a finish of some type to protect and seal it, and my original objective with the bamboo was to rely as much as possible on natural finishes, though in the end I did not stay with this intention . I’ve done experiments with natural oil finish inside the bore, and I’ve also used shellac (another all natural finish). But the problem I ran into had to do with curing of the finish. I live in a cool, humid climate and oil finishes simply don’t cure properly. I’ve tried quite a few over the years, and even oils that are supposed to polymerize never quite seem to do so, remaining tacky. Shellac behaves a bit better, but it is also slow to cure and it requires a lot of coats in the bore to be an effective barrier, and lots of cure time in between. So the process of finishing gets really protracted and cumbersome. So in the end I’ve been using the same finishes that I use on my wooden flutes, which is a clear-coat marine epoxy for the bore and a lacquer and wax finish on the outside. These finishes are the first step in protecting and stabilizing the bamboo. The theory behind all of this is that if I create a substantial enough protective barrier, any changes in moisture within the bamboo will happen very slowly, reducing any sudden movement of the bamboo and limiting its propensity to crack.
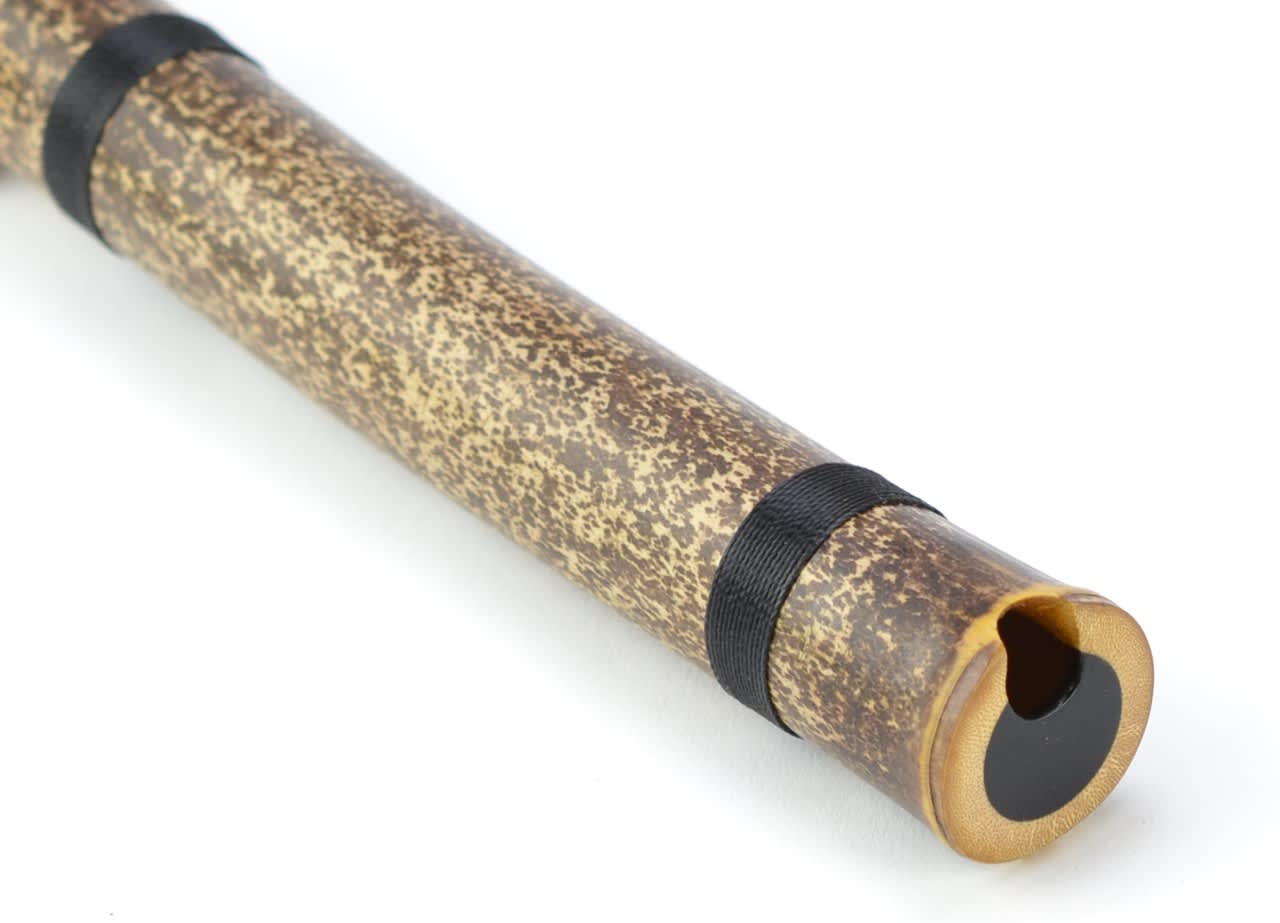
The final step is the binding of the bamboo. I don’t do this to every type of bamboo, but when appropriate I use this tried and true traditional approach to reinforce the flute body. It’s attractive as well, giving some visual interest to the flute with the added advantage of reducing movement of the bamboo.
Published Thursday, November 10, 2022